How to Add a Release
Relevant video:
One of the first things you'll probably want to do in MusicBrainz is to add a release. There are two ways to start the process.
If you're in the page for the artist you want to add a release to, just press "Add release" in the sidebar (if it's a different version of a release we already have, it's better to press "Add release" in the release group page instead!).
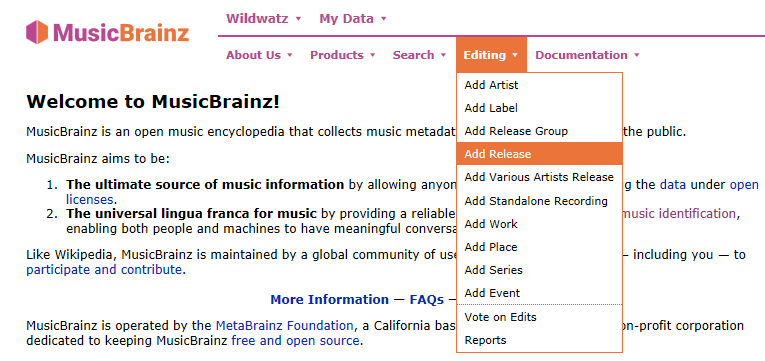
Or you can just press "Add release" (or "Add Various Artists release") in the editing menu:
Any of these options will bring you to the release editor - which might have some fields already filled depending on where you entered it from. Now let's take a look at the first tab!
Release Information
This tab is full of text fields! Most of them are not strictly required, although you should always try give as much information as you have. Make sure to look at the release style guidelines! Most of the information you need is there. If the release is of "classical" - as opposed to "popular" - music, check the classical guidelines.
Release Information
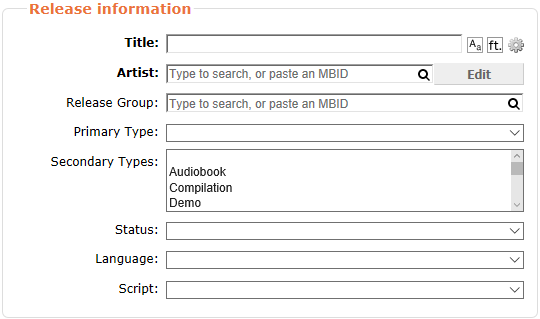
The first set of fields here is also called "Release Information":
First of all, you'll need to enter a title! Take a look at the guidelines for titles.
Artist comes next. If you have arrived here from the "Add release" link in the artist page, it will be pre-filled! To use the artist credit system and get extra options to configure the release artist (like adding more than one, or changing the way the name is credited) click the box with the arrows by the artist field (see How to Use Artist Credits).
 Note: You can create new artists and labels directly from the release editor. Search for the name, and click "Add new artist" (or label) at the bottom of the search - that will bring up a form where you can add it and have it ready for using.
Then you'll see the Release Group field. In most cases, you can just leave this untouched, as it is only used to choose the release group will be placed in - and you'll usually either want to add a new one or have it pre-filled.
Next come the Types, primary and secondary. You can select more than one secondary type if several apply (select them by control-clicking) but only one primary type. To see what each type is, check our list of types. The types are actually a property of the release group, so if you are using an existing release group, you won't be able to change them from here.
The status will usually be Official, but do read the descriptions of them before choosing. Note that Pseudo-release is a very specific term, used mostly for translations and transliterations of track titles, and probably not what you want if you have doubts.
Language should be easy! But note this is the language of the titles, not the lyrics - an instrumental release with titles in French should have French as a language.
And the last one is script ("alphabet"). You can check a list of common scripts, but most European languages, including English, use the Latin script (the script this guide is written in!)
Release Event
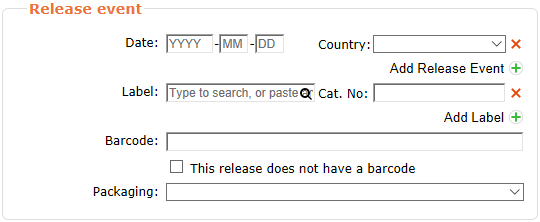
The second set of fields is the Release Event - this deals with when and how this release was... well, released.
For the date (in the year-month-day format) enter the date it was released. The copyright year is not necessarily the same as the release year, especially for compilations and reissues. Don't assume it is. It should also not be the original release date unless the release you are entering is the original.
The country is the one the release was released in. If you have a physical release and don't know the country, there's sadly no perfect way to find out for sure, but the barcode and the countries of the label and the artist sometimes help. If you are entering a digital release, the country will depend on where it is available from. Pages like Bandcamp, SoundCloud and other similar sites have no region restrictions. In this case, it is safe to set the release to [Worldwide]. For releases from shops like Amazon or iTunes, that have region restrictions, it is safest to choose the country of the shop (if you've bought it in the French iTunes store, use France). Remember that you can always leave the field blank if you are not sure!
Note that you can add multiple date/country combinations per release; this should only be done if the release is exactly the same. Different versions of a release, with a different cover, different logos/text or different labels, should be entered separately, not as multiple release events for the same release; a shared Benelux release or UK/Ireland release though can and should be added with the country/date pairs that apply.
For labels, we follow imprints, not companies. This means you should look at the label logos, not the copyright statements. See How to Identify Labels for more info. Also, Bandcamp, iTunes or CD Baby are distribution platforms, not labels. Don't use them! Each label can be paired with a catalog number.
The barcode field should be simple! If there's no barcode, just mark the checkbox that says so and continue.
The packaging of a physical release should be easy to determine if you have it in front of you: you can check the list of packaging options. For digital releases, use None.
Additional Information
The last two fields are free text and completely optional.
The annotation is used for stuff that doesn't fit in the database structure: read the Annotation page to find out more.
The disambiguation field is intended to differentiate versions of the same release, especially in cases where there are two releases which are almost equal (same barcode and catalog number) but, for example, have two different covers, or to differentiate the bonus track releases from Amazon and iTunes.
Release Duplicates
If you are taken to this tab, it will be because there are other releases with the same artist and title in MusicBrainz, and you will be presented with a list:
If the release you want to add is there... then you should have checked better before starting to add a new one! But if a *similar* release is there (say, an edition from another country, or the original version of your reissue with bonus tracks) you can select it marking the circle. This allows you to base the tracklist and recordings of the release you're adding in those of the chosen release, and can save quite a lot of time in the next steps. Please only use this if the recordings should also be the same - this is usually the case for different releases of an album, unless it has been remixed.
Tracklist
The main use of this tab is -you'd never guess!- to enter the tracklist for the release. When you reach this tab, you'll see something like this (unless you have chosen a release in the previous step - if that's the case, you will already get a full table):
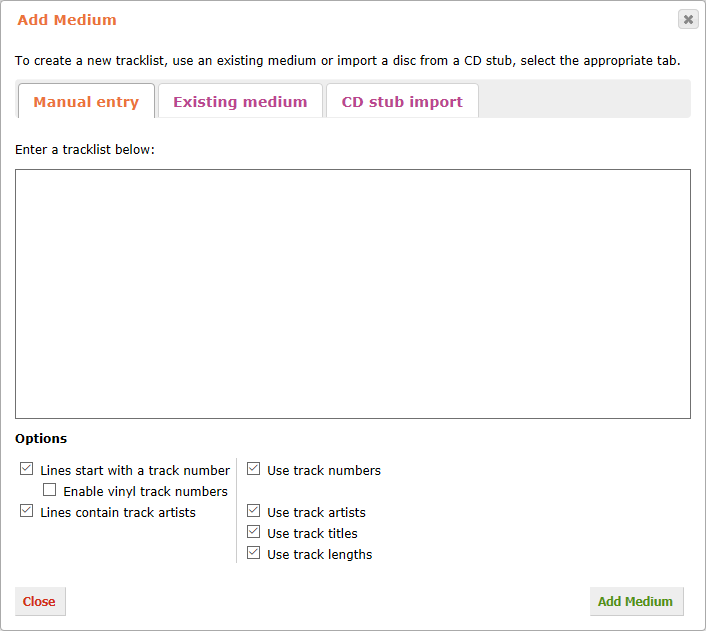
Additionally, this window should pop up:
Now you have four options to enter the tracklist.
The Track Parser (Manual entry)
If you have a tracklist you can copy and paste, you can input it here. By default the parser uses the format No. Title (mm:ss) (as in 1. Planet Telex (4:21)) for single artist releases, and No. Title - Artist (mm:ss) (as in 1. Planet Telex - Radiohead (4:21)) for various artist releases, although it accepts a few variations on this format. You can (de)select the checkboxes under the input field to change the way in which the parser uses the data. You can also enter Artist - Title instead of Title - Artist and then swap the fields. This is especially useful for various artist releases.
When you're done, just press "Add Medium" and a tracklist table will be created with the data you've given. After that you can correct anything that seems wrong in the table.
Alternatively, you can open the track parser by clicking on the "Track Parser" button if you accidently closed the window.
Manual input
If you don't have a tracklist that you can copy and paste, click "Add Medium" without entering any information or simply close the window. Now you can enter the number of tracks in the "Add [ ] tracks" box and press the plus button, which will give you a table like this:
The title field is where you should enter the track titles (follow the guidelines for titles).
The artist field is where each track artist goes. As in most cases that will be the same as the release artist, those are usually pre-loaded (except if the release is a Various Artists one). By pressing the "Edit" button you can use the artist credits system to credit more than one artist, for example for featured artists.
The length field is where you should enter the duration of tracks. Note that in some cases (if you're adding the release from a Disc ID instead, as per How to Add Disc IDs) those will be automatically set from the CD info, and you won't be able to change them.
Existing medium
This allows you to load an existing medium from the database. This is most useful when a release includes - as a bonus, or as part of a boxset - a previously released medium, as you will load not only its tracklist but also its recording associations.
CD stub import
"CD stub import" allows you to import some info from a CD Stub: this will save some typing, although you should always correct the imported info so it follows the style guidelines.
Adding Mediums
By default, on a new add, only 1 medium is shown. If you are editing a multi-media release (multi-disc for example), you will want to add more. For that, press the "Add Medium" button again and follow the same process as before.
Data Tracks
When editing a medium, you have the option of adding a special section for data tracks by checking the box labeled "This disc contains data tracks at the end". Please follow the relevant guidelines for how and when to do so.
Extra Stuff
Before advancing to the next tab, make sure you set the right format for each medium! This can be done from a dropdown above each input area.
If there is more than one disc in the release, you will also be able to set a disc title for each one. This is for cases where each disc has its own title; don't enter "Disc 1" or "CD 1" as titles.
You'll also see a "Guess Case" section.
This will try to make the titles align more closely to our guidelines. For using it, select the appropriate guess case mode and press Guess Case. Note that this guessing won't always be perfect even for English, so you should always check the titles again before submitting and make sure they look OK. If the titles are German, it's better not to even try, as the Guess Case can't deal with the German capitalisation style at all.
Recordings
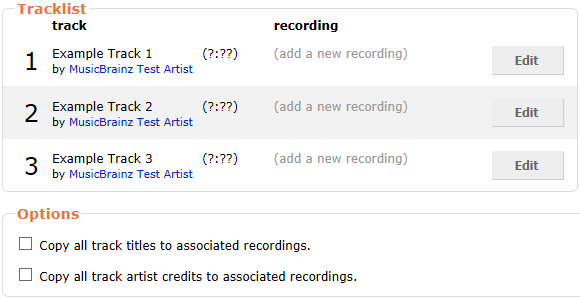
Here you can assign recordings to the tracks in the release. If you're adding a new release and you haven't based it in an existing one, the default behavior will be to create a new recording for each track:
This is not always what is wanted, and if you're sure that the recording is the same as one already in the database (see the recording guidelines), you should press "Edit" and search for it.
If in doubt, it's probably better to create a new recording, as merging them is less time-consuming than splitting one that is wrongly assigned - and the information is less accurate, but not incorrect.
On the other hand, if a track has an assigned recording that is not correct (because you based your new release on an existing one and this track is different, or because the existing release you're editing is wrong) you can change it here - or just make it so a new one is created when you enter the edit.
Edit Note
Here you'll see a preview of the results of your edit. The list can be pretty long, but please do take a look at it and verify that everything looks correct! If it doesn't, you can go back to previous tabs and fix the errors.
Once you're satisfied with the displayed preview, you should enter an edit note. Please check How to Write Edit Notes and try to make your edit note as useful as you can! Even if you are entering the info from a physical release in front of you, it is helpful if you can give an online source that proves the data. Of course, sometimes this is just not possible, especially for obscure / underground releases. But at least make a quick check to see if you can find anything.
And you're done! Press Enter edit and your edit will enter the voting queue.
Writing, performance and engineering credits
Once you've added a release, you can add the various credits that are often listed in a booklet or liner. The easiest way to do this is usually through the relationship editor. That allows you to add, for example, lead vocals credits for artist A to all the recordings and piano credits for artist B to tracks 5-9. You can get to the relationship editor from the "Edit relationships" link in the sidebar of a release.
Adding a second CD
You have a multi-CD box and have already created a release by adding the first CD via its cdtoc-attach-URL. Now you want to add the second or third CD to the same release.
This is not easy to do currently. The best way seems to be:
- Edit the release
- In the tracklist, add a new medium: Manual entry, do not enter anything and click "Add medium".
- Add the information for each track (title & artist; track times will be automatically added later) and publish the release.
- Open the cdtoc-attach-URL again. This time the new CD in the release can be selected. This will also populate track times.
| How-To Pages | |
|---|---|
| Introductory Guides | Beginners' Guide · Creating an Account · Editing · Voting · Writing Edit Notes |
| Basic How-Tos | Adding an Artist · Adding Relationships · Using the Relationship Editor · Using Artist Credits · Adding a Release · Works · Events · Places · Series · Instruments · Areas |
| Specific How-Tos | Merging Releases · Merging Recordings · Removing Entities · Adding Cover Art · Identifying Labels · Splitting Artists · Adding Standalone Recordings · Adding Disc IDs · Cancelling Edits · Searching for Edits · Reporting a User · Reporting an Issue · Working with AcoustIDs · Tagging Files with Picard |

