How to Submit Analyses to AcousticBrainz: Difference between revisions
No edit summary |
(RIP AcousticBrainz: https://blog.metabrainz.org/?p=9385 / AcousticBrainz submissions, data dumps, and next steps ) |
||
| (10 intermediate revisions by 2 users not shown) | |||
| Line 1: | Line 1: | ||
{{HistoryHeader}} |
|||
When adding a release or a single recording to MusicBrainz, it is recommended to submit AcousticBrainz analyzes for all of the added material too. This How-To explains this process as part of the (usual) workflow: |
|||
[[AcousticBrainz]] is a project with the aim to crowdsource acoustic information for all music in the world and to make it available to the public. That means if you have a database of music, it would be great if you helped this project by contributing to it. |
|||
* At first, the release or recording is (manually) [[How_to_Add_a_Release|added in MusicBrainz]]. |
|||
This works through analysing your music files for acoustic characteristics - including low-level spectral information and information for genres, moods, keys, scales and much more - and submitting these analyses to AcousticBrainz. |
|||
* After that, the relevant files (recordings) are [https://picard.musicbrainz.org/docs/guide tagged with picard]. |
|||
This process of analysing and submitting is luckily full-automatic if you use one of our AcousticBrainz clients, so you just have to do the setup (installing and using the client, which is to be explained in this How-To). |
|||
* Last but not least, the AcousticBrainz analyzes are submitted. |
|||
== Prerequisites == |
|||
This step is the last step, because all files need to have both [[MusicBrainz_Identifier| MBIDs]] and [[AcoustID]]s to be able to get analyzed for [http://acousticbrainz.org AcousticBrainz]. The former is automatically added when the files are tagged with Picard (that's why this has to be done before); the latter can be added with Picard, but because this can sometimes be a bit tricky, another way to add these AcoustIDs is described here. In the case that Picard already did this, this first step can be skipped: |
|||
To analyse your music files you need to have the following: |
|||
== Adding AcoustIDs == |
|||
*A working AcousticBrainz client, downloadable at the [https://acousticbrainz.org/download AcousticBrainz website] - at this time, only Windows, OSX and Linux are supported |
|||
If no AcoustIDs were created through Picard, you have to use the [https://acoustid.org/fingerprinter AcoustID Fingerprinter] to do this. This works as follows: |
|||
*The music files (if available use lossless files, otherwise lossy files will do it too), which have to be properly tagged with [[MusicBrainz_Identifier| MBIDs]] |
|||
Put all the files in one folder and select this folder in the Fingerprinter: |
|||
:{{note}} These MBIDs are the identifiers for different pieces of music (also distinguishing between different recordings). |
|||
| ⚫ | |||
This means you have to tag your files by using a program capable of doing that. Look [[MusicBrainz_Enabled_Applications|here]] to find a list of possible taggers. Additionally, if your files aren't in the [https://musicbrainz.org MusicBrainz] database yet, you should consider adding them first. |
|||
*Relating links: Adding a [[Standalone_Recording|standalone recording]] / [[How_to_Add_a_Release|release]] |
|||
Then click "Fingerprint..." and wait until the process finishes: |
|||
== Analysing files == |
|||
| ⚫ | |||
After extracting the downloaded packages, they are ready to use. |
|||
=== Windows === |
|||
As soon as all the files have their related MBIDs and AcoustIDs, you can continue with the next step. |
|||
| ⚫ | |||
== AcousticBrainz Analyze (GUI) == |
|||
For this, [https://acousticbrainz.org/download AcousticBrainz-GUI] is needed. |
|||
| ⚫ | |||
[[File:Analyze1.png|300px]] |
[[File:Analyze1.png|300px]] |
||
| ⚫ | |||
| ⚫ | |||
[[File:Analyze2.png|300px]] |
[[File:Analyze2.png|300px]] |
||
| Line 37: | Line 35: | ||
:{{note}} This may take a while, so make sure to have a stable internet connection and preferably don't do anything else during this time on your computer. |
:{{note}} This may take a while, so make sure to have a stable internet connection and preferably don't do anything else during this time on your computer. |
||
As you can see, properly tagged files will be submitted, files without MBIDs will be skipped, so make sure to have the files properly tagged. Additionally, all previously analysed files won't be analysed a second time (when clicking "Analyze..." again); the program will output, that there are no audio files in the selected directories (although there are, but have already been analysed). |
|||
Other than this, you have to do nothing, because the program automatically submits the analyzes to the AcousticBrainz server when you are connected to the internet. |
|||
=== Linux === |
|||
*Open the extracted folder and open the terminal from this folder. |
|||
*Enter the command: ''./abzsubmit [path to the files/directories]'' to analyse all files at the given paths. |
|||
All files at the given paths/directories (and sub-directories) are going to be analysed. |
|||
In this example, all files in the "Music" folder (located in the "abzsubmit-0.1" folder) are analysed: |
|||
| ⚫ | |||
*Wait until the process is finished. |
|||
| ⚫ | |||
As you can see, properly tagged files will be submitted, files without MBIDs will be skipped, so make sure to have the files properly tagged. Additionally, all previously analysed files won't be analysed a second time (when trying to analyse again); the program will directly show ":) done". |
|||
:{{note}} Currently there is a little bug which leads to a program output of ":) done" if the program '''tried''' to analyse a file at a given directory already even if this '''didn't work''' the first time (because of missing MBID for example). To bypass this bug, it is suggested to change the directories' name slightly every time before analysing (in this example "Music" to "Music2" to "Music3" for example). The program should then analyse every file correctly again (without skipping it), although the same happens to the files which indeed have been analysed and submitted correctly the first time. |
|||
== Have a look at your submissions == |
|||
After having analysed and submitted the files, you can see the analyses (including high- and low-level JSON documents) at: |
|||
*<nowiki>http://acousticbrainz.org/<MBID></nowiki> |
|||
You just have to replace <MBID> with the related MBID of one recording you just submitted. This ID can be found in every tag editing software or alternatively in the [https://musicbrainz.org MusicBrainz] database as part of the recordings' URL or at the recordings' details (if they were added to MusicBrainz). |
|||
After that, you basically completed the whole process of adding a release/recording. |
|||
Latest revision as of 14:47, 21 June 2022
| Status: This Page is Glorious History!
The content of this page either is bit-rotted, or has lost its reason to exist due to some new features having been implemented in MusicBrainz, or maybe just described something that never made it in (or made it in a different way), or possibly is meant to store information and memories about our Glorious Past. We still keep this page to honor the brave editors who, during the prehistoric times (prehistoric for you, newcomer!), struggled hard to build a better present and dreamed of an even better future. We also keep it for archival purposes because possibly it still contains crazy thoughts and ideas that may be reused someday. If you're not into looking at either the past or the future, you should just disregard entirely this page content and look for an up to date documentation page elsewhere. |
AcousticBrainz is a project with the aim to crowdsource acoustic information for all music in the world and to make it available to the public. That means if you have a database of music, it would be great if you helped this project by contributing to it. This works through analysing your music files for acoustic characteristics - including low-level spectral information and information for genres, moods, keys, scales and much more - and submitting these analyses to AcousticBrainz. This process of analysing and submitting is luckily full-automatic if you use one of our AcousticBrainz clients, so you just have to do the setup (installing and using the client, which is to be explained in this How-To).
Prerequisites
To analyse your music files you need to have the following:
- A working AcousticBrainz client, downloadable at the AcousticBrainz website - at this time, only Windows, OSX and Linux are supported
- The music files (if available use lossless files, otherwise lossy files will do it too), which have to be properly tagged with MBIDs
 Note: These MBIDs are the identifiers for different pieces of music (also distinguishing between different recordings).
This means you have to tag your files by using a program capable of doing that. Look here to find a list of possible taggers. Additionally, if your files aren't in the MusicBrainz database yet, you should consider adding them first.
- Relating links: Adding a standalone recording / release
Analysing files
After extracting the downloaded packages, they are ready to use.
Windows
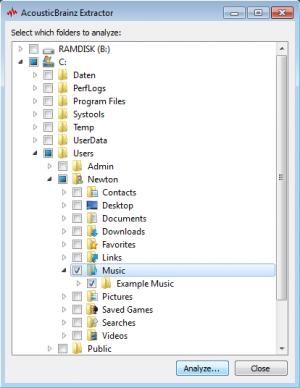
- Open acousticbrainz-gui.exe and select all directories/folders where the files are located (all sub-directories of the selected directory will automatically be selected too) and click "Analyze...".
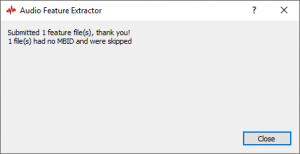
- Now wait until the process is finished:
 Note: This may take a while, so make sure to have a stable internet connection and preferably don't do anything else during this time on your computer.
As you can see, properly tagged files will be submitted, files without MBIDs will be skipped, so make sure to have the files properly tagged. Additionally, all previously analysed files won't be analysed a second time (when clicking "Analyze..." again); the program will output, that there are no audio files in the selected directories (although there are, but have already been analysed).
Linux
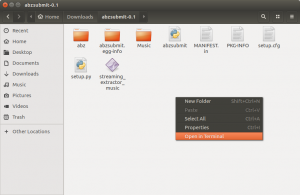
- Open the extracted folder and open the terminal from this folder.
- Enter the command: ./abzsubmit [path to the files/directories] to analyse all files at the given paths.
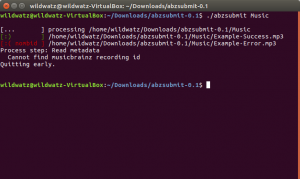
All files at the given paths/directories (and sub-directories) are going to be analysed. In this example, all files in the "Music" folder (located in the "abzsubmit-0.1" folder) are analysed:
- Wait until the process is finished.
As you can see, properly tagged files will be submitted, files without MBIDs will be skipped, so make sure to have the files properly tagged. Additionally, all previously analysed files won't be analysed a second time (when trying to analyse again); the program will directly show ":) done".
 Note: Currently there is a little bug which leads to a program output of ":) done" if the program tried to analyse a file at a given directory already even if this didn't work the first time (because of missing MBID for example). To bypass this bug, it is suggested to change the directories' name slightly every time before analysing (in this example "Music" to "Music2" to "Music3" for example). The program should then analyse every file correctly again (without skipping it), although the same happens to the files which indeed have been analysed and submitted correctly the first time.
Have a look at your submissions
After having analysed and submitted the files, you can see the analyses (including high- and low-level JSON documents) at:
- http://acousticbrainz.org/<MBID>
You just have to replace <MBID> with the related MBID of one recording you just submitted. This ID can be found in every tag editing software or alternatively in the MusicBrainz database as part of the recordings' URL or at the recordings' details (if they were added to MusicBrainz).
| How-To Pages | |
|---|---|
| Introductory Guides | Beginners' Guide · Creating an Account · Editing · Voting · Writing Edit Notes |
| Basic How-Tos | Adding an Artist · Adding Relationships · Using the Relationship Editor · Using Artist Credits · Adding a Release · Works · Events · Places · Series · Instruments · Areas |
| Specific How-Tos | Merging Releases · Merging Recordings · Removing Entities · Adding Cover Art · Identifying Labels · Splitting Artists · Adding Standalone Recordings · Adding Disc IDs · Cancelling Edits · Searching for Edits · Reporting a User · Reporting an Issue · Working with AcoustIDs · Tagging Files with Picard |


