User:CallerNo6/sandbox2: Difference between revisions
(images commented out) |
(copy of "how to scan cover art") |
||
| Line 1: | Line 1: | ||
This is a guide for scanning and editing cover art with [http://www.gimp.org/ GIMP]. I also use the [http://registry.gimp.org/node/27986 Resynthesizer plugin] for GIMP. |
|||
<small>[[Products]] > [[MusicBrainz Picard]] > [[Picard Documentation]] > How to Tag Files With Picard</small> |
|||
This quick start guide describes how you can tag your files using [[MusicBrainz Picard]]. |
|||
# Click '''View''', and then click '''File Browser'''. |
|||
# Drag a folder to the '''Unmatched Files''' folder in the right-hand pane. |
|||
<!--[[Image:Picard2011_1.png]]--> |
|||
# Wait for Picard to process the files (the names will turn from grey to black) and then click the '''Cluster''' toolbar button to cluster files into album clusters. |
|||
<!--[[Image:Picard2011_2.png]]--> |
|||
# Select a clustered album and click the '''Lookup''' toolbar button to look the cluster up. Depending on your previous metadata, album will show up in the right-hand pane. If an album shows up, go to step 7. Since you are a new Picard user, we recommend that you read the steps in between as well. |
|||
<!--[[Image:Picard2011_3.png]]--> |
|||
# If nothing happened when you clicked the '''Lookup''' toolbar button, click the '''Lookup''' button in the bottom panel. Your default browser will open and allow you to find the right album manually. |
|||
<!--[[Image:Picard2011_4.png]] --> |
|||
# Pay attention to the amount of tracks in each album, and pick the one you have. Click the [[Image:mblookup-tagger.png]] icon. |
|||
<!--[[Image:Picard2011_5alt2.png]] --> |
|||
# Drag the clustered album onto the album that was just opened, if it didn't happen automatically. |
|||
<!--[[Image:Picard2011_6.png]] --> |
|||
# Depending on your previous metadata, Picard will try to guess the matching tracks. The order is green > yellow > orange > red, where green is the best match. If you are seeing a lot of red and orange, it could mean that Picard has guessed wrong, or that your files didn't have a lot previous metadata to work with. |
|||
<!--[[Image:Picard2011_7.png]]--> |
|||
#* If this is the case, it's recommended to click a track and compare the metadata using the '''Original Metadata''' and '''New Metadata''' panels at the bottom of picard window. If there is an incorrect match, simply drag & drop the track to its correct spot. |
|||
<!--[[Image:Picard2011_8alt.png]] --> |
|||
# When you are satisfied with the matches, select the album you want to save and click on the '''Save''' toolbar button to save files. |
|||
<!--[[Image:Picard2011_9.png]] --> |
|||
# A green check mark means the file is saved in its proper location. |
|||
<!--[[Image:Picard2011_10.png]] --> |
|||
You can scan images right from the GIMP. Go to '''File''' → '''Create''' → '''Scanner/Camera…'''<br /> |
|||
At first there may not seem much to Picard, but a lot of Picard's power is in its extensive drag and drop features. Try some of these operations: |
|||
[[File:scanning1.png]] |
|||
* Drag a file from the file browser to an album track. |
|||
<br /><br /> |
|||
* Drag a file from the file browser to an album -- this attempts to match the file to the album automatically. |
|||
After (optionally) selecting your scanner as the source, you’ll be presented with a new screen:<br /> |
|||
* Drag a directory from the file browser to an album -- this attempts to match all the files from the dir to the album. |
|||
[[File:scanning2.png]]<br /> |
|||
* Drag an album cluster onto an album to match the cluster to the album. |
|||
<br /> |
|||
* Drag one album onto another to match all the files from one to the other. |
|||
To the right, click on the tab '''Advanced Mode''' (1). Set the '''Output Resolution''' to 600 dpi (2), then click on '''Preview''' (3).<br /> |
|||
* Drag an album cluster into unmatched files to move the cluster back to unmatched. |
|||
Some notes: |
|||
* Drag unmatched files from an album onto another album or back to unmatched files. |
|||
*I usually don’t bother with neatly aligning what I am scanning on the scanner, I just rotate it afterwards. |
|||
*Scanning at 600 dpi may seem overkill, but in my experience scanning at a high resolution is the best way to avoid moiré patterns ([https://en.wikipedia.org/wiki/Moiré_pattern Wikipedia]). Scanning in this resolution doesn’t take that much longer on a modern scanner, but it does create large files to work with, which may create problems on computers with low RAM. |
|||
==Related How To Articles== |
|||
*After completing the preview scan, GIMP automatically selects a part of the scanning area to use for the real scan. I usually find that selection to be a bit tight though, so I always draw a slightly bigger one. |
|||
*The options under Image Settings give some possibilities for automatic adjustments. I prefer to do those myself later (if at all), so I usually leave them off. |
|||
* [[How To Add Disc IDs|How to add Disc IDs]] |
|||
When you’re satisfied with all the settings, click Scan (4).<br /> |
|||
* [[How PUIDs Work|How PUIDs work]] |
|||
<br /> |
|||
If the image is not yet horizontal, you can rotate the image with the '''Rotate Tool''' (highlighted) and dragging anywhere on the image. Aligning is quite easy if you zoom in and use the '''Rotate''' dialogue as a ruler along with a part of time image which should be horizontal or vertical (like an edge or a line of text).<br /> |
|||
==Further Information== |
|||
[[File:scanning3.png|1672px]]<br /> |
|||
<br /> |
|||
* [[Picard Tagger|MusicBrainz Picard]] |
|||
When you zoom out again, you’ll notice that some bits are missing. '''Image''' → '''Autocrop Image''' will solve that problem.<br /> |
|||
* [[Picard Documentation|Picard documentation]] |
|||
[[File:scanning4.png|1672px]]<br /> |
|||
* [[Picard Screencasts|Picard screencasts]] |
|||
<br /> |
|||
{{HowtoBox}} |
|||
We still have a transparency (alpha) layer. Since we have no use for it and it does take space in the final image, we’ll just remove it: '''Layer''' → '''Transparency''' → '''Remove Alpha Channel'''.<br /> |
|||
[[Category:MusicBrainz Picard]][[Category:How To]][[Category:WikiDocs Page]] |
|||
[[File:scanning5.png]]<br /> |
|||
<br /> |
|||
Next is cropping the image: Select the '''Rectangle Select Tool''' (1), draw the part of the image you want to crop to (you can resize the selection later by dragging the handles) (2). When you’re happy with the selection, go to '''Image''' → '''Crop to Selection''' (3). |
|||
<br /> |
|||
[[File:scanning6.jpg]]<br /> |
|||
<br /> |
|||
Now we’ll use the '''Resynthesizer plugin''' to repair bits of dirt, dust, small damage etc. First select all the bits you want repaired (you can add selections to the current selection by holding Shift while draging, or substract using Ctrl; you can also undo and redo selections with Ctrl+Z and Ctrl+Y). Then go to '''Filters''' → '''Enhance''' → '''Heal Selection'''.<br /> |
|||
[[File:scanning7.png|1672px]]<br /> |
|||
<br /> |
|||
The default settings are usually good enough, but you can of course fiddle with them if you’re not satisfied with the results (see this [http://blog.patdavid.net/2012/08/getting-around-in-gimp-heal-selection.html blogpost] for a more thorough introduction).<br /> |
|||
[[File:scanning8.png]]<br /> |
|||
<br /> |
|||
Next is the trickiest part: colour correction. It’s hard to trust your screen’s colours unless you have professionally calibrated it, so I’m usually reluctant to adjust too much. But in this case, the brown background is supposed to be gold (always a problematic colour for scanners), so I have to do something. In this case the answer was under '''Colours''' → '''Colour Balance'''. The changes are only applied after you click '''Ok''' and after that you can still undo any changes, so you can experiment with all options without having to worry about anything.<br /> |
|||
[[File:scanning9.jpg|1672px]]<br /> |
|||
<br /> |
|||
The other options in the '''Colours''' menu can be useful as well, but for now we’ll use one more: |
|||
Go to '''Colours''' → '''Levels'''.<br /> |
|||
[[File:scanning10.png]]<br /> |
|||
<br /> |
|||
Beneath '''All Channels''', next to '''Auto''', there are three pipettes, a black one, a grey one and a white one. Simply click the white pipette and then click on an area in the image which should be white (like the letteres EMI). Then click the black pipette and something in the image that should be black.<br /> |
|||
[[File:scanning11.png]]<br /> |
|||
<br /> |
|||
The image we have is huge, and that’s probably overkill. You can resize it to whatever you think convenient under '''Image''' → '''Scale Image'''.<br /> |
|||
[[File:scanning12.png]]<br /> |
|||
<br /> |
|||
GIMP saves images in its own format, which is useful if you want to edit an image at a later date, but for MusicBrainz you’ll want to export an image to something more common. Go to '''File''' → '''Export to image.png''' or '''Export As…'''<br /> |
|||
[[File:scanning13.png]]<br /> |
|||
<br /> |
|||
The Cover Art Archive allows uploading JPG, GIF, PNG and PDF files. PDF isn’t an image format and GIF is only useful for animated artwork, so the choice here is between JPG and PNG. JPG is lossy, which means that every time you save it, it loses some quality. It’s also ancient, and looking at a JPG image is the visual equivalent of listening to an 64kbps MP3 you downloaded in the Napster age. PNG is lossles, and because we’re archiving something, we don’t want to compromise for quality. The Cover Art Archive will automatically generate 500px and 250 px JPG files when you upload the original anyway.<br /><br /> |
|||
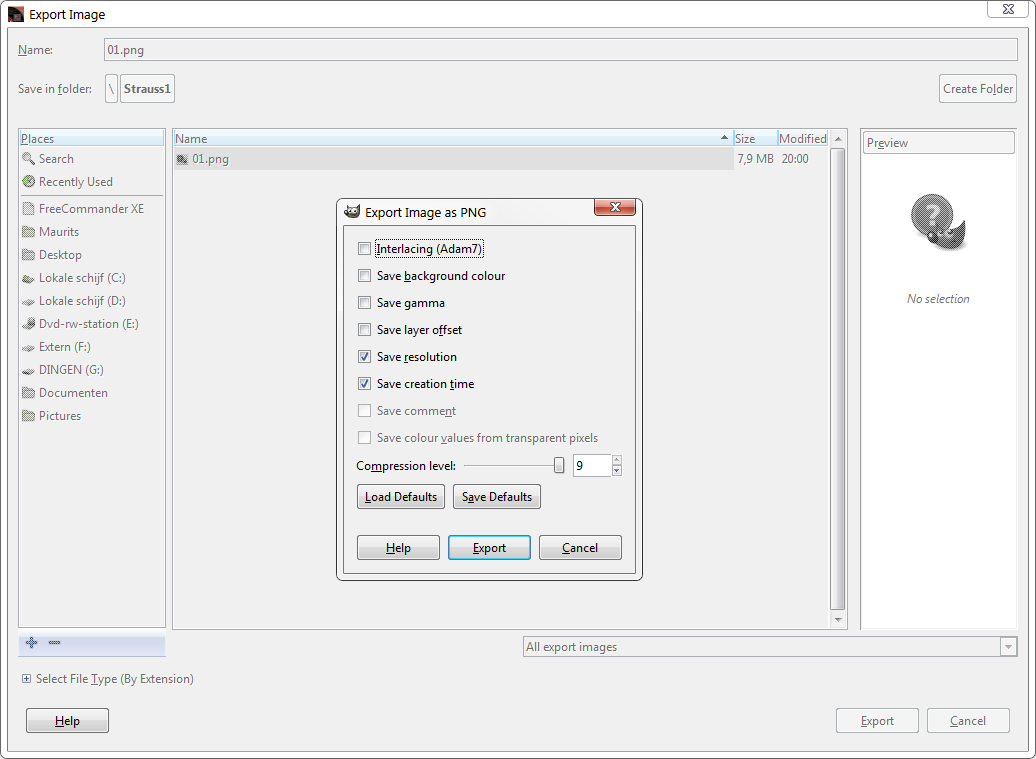
If you append .png to the file name, GIMP will automatically save as png if you click '''Export'''. The default settings are good enough, so click '''Export''' again and you’re done.<br /> |
|||
[[File:scanning14.png]] |
|||
Latest revision as of 16:43, 30 August 2016
This is a guide for scanning and editing cover art with GIMP. I also use the Resynthesizer plugin for GIMP.
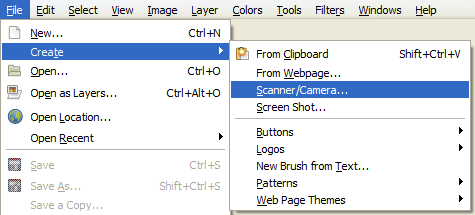
You can scan images right from the GIMP. Go to File → Create → Scanner/Camera…
After (optionally) selecting your scanner as the source, you’ll be presented with a new screen:
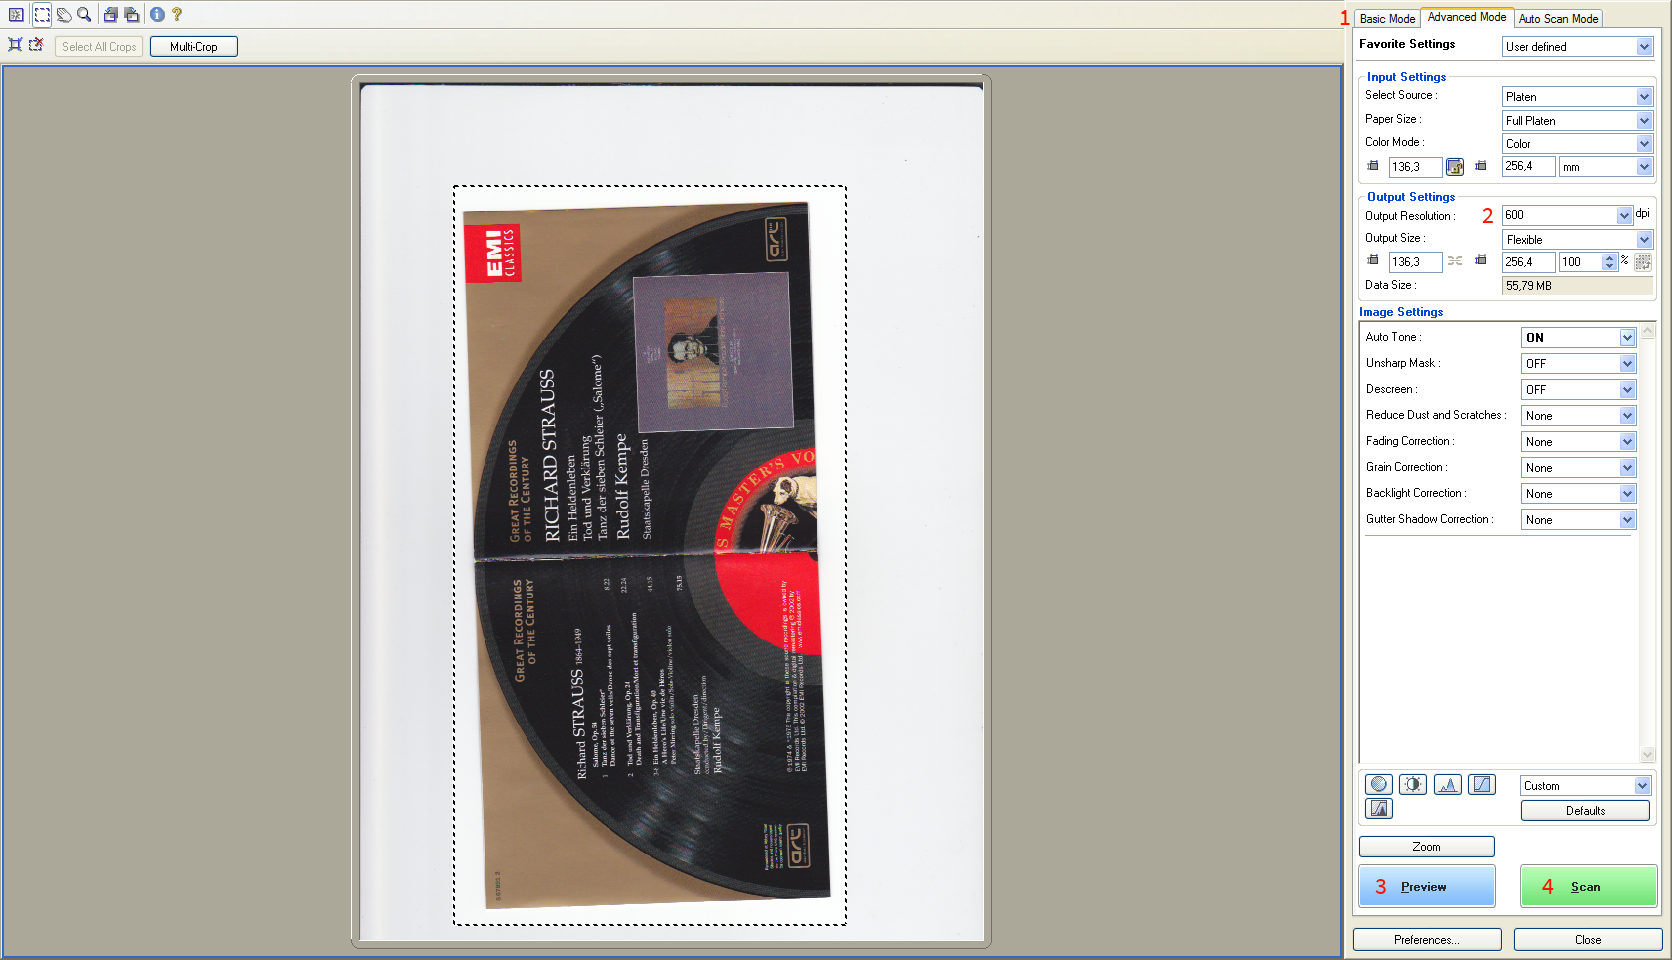
To the right, click on the tab Advanced Mode (1). Set the Output Resolution to 600 dpi (2), then click on Preview (3).
Some notes:
- I usually don’t bother with neatly aligning what I am scanning on the scanner, I just rotate it afterwards.
- Scanning at 600 dpi may seem overkill, but in my experience scanning at a high resolution is the best way to avoid moiré patterns (Wikipedia). Scanning in this resolution doesn’t take that much longer on a modern scanner, but it does create large files to work with, which may create problems on computers with low RAM.
- After completing the preview scan, GIMP automatically selects a part of the scanning area to use for the real scan. I usually find that selection to be a bit tight though, so I always draw a slightly bigger one.
- The options under Image Settings give some possibilities for automatic adjustments. I prefer to do those myself later (if at all), so I usually leave them off.
When you’re satisfied with all the settings, click Scan (4).
If the image is not yet horizontal, you can rotate the image with the Rotate Tool (highlighted) and dragging anywhere on the image. Aligning is quite easy if you zoom in and use the Rotate dialogue as a ruler along with a part of time image which should be horizontal or vertical (like an edge or a line of text).
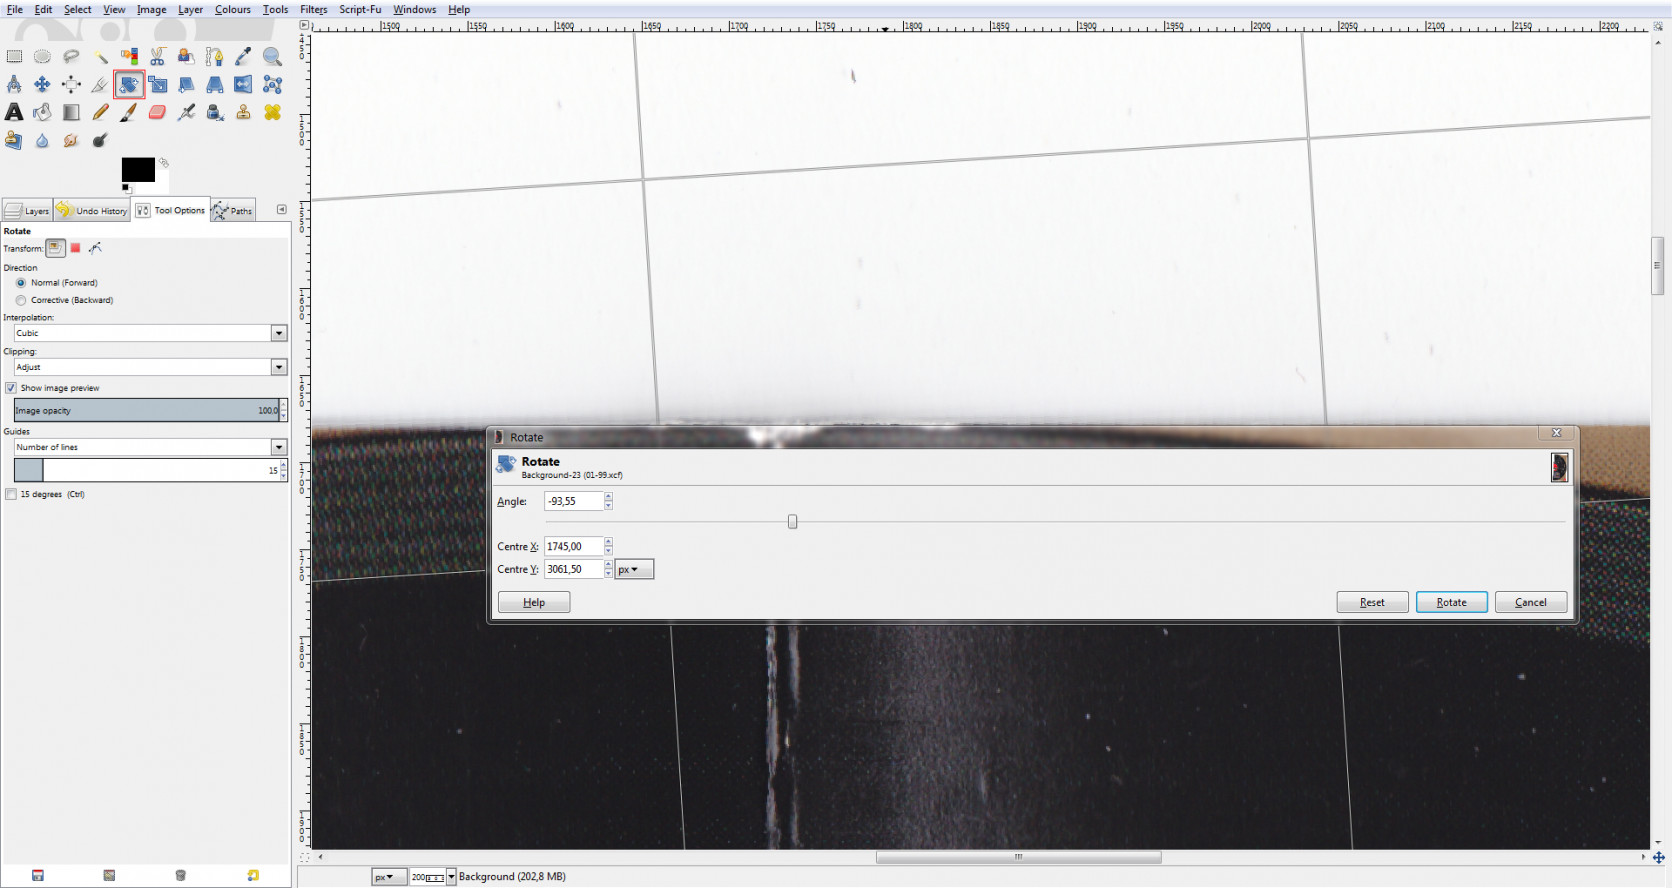
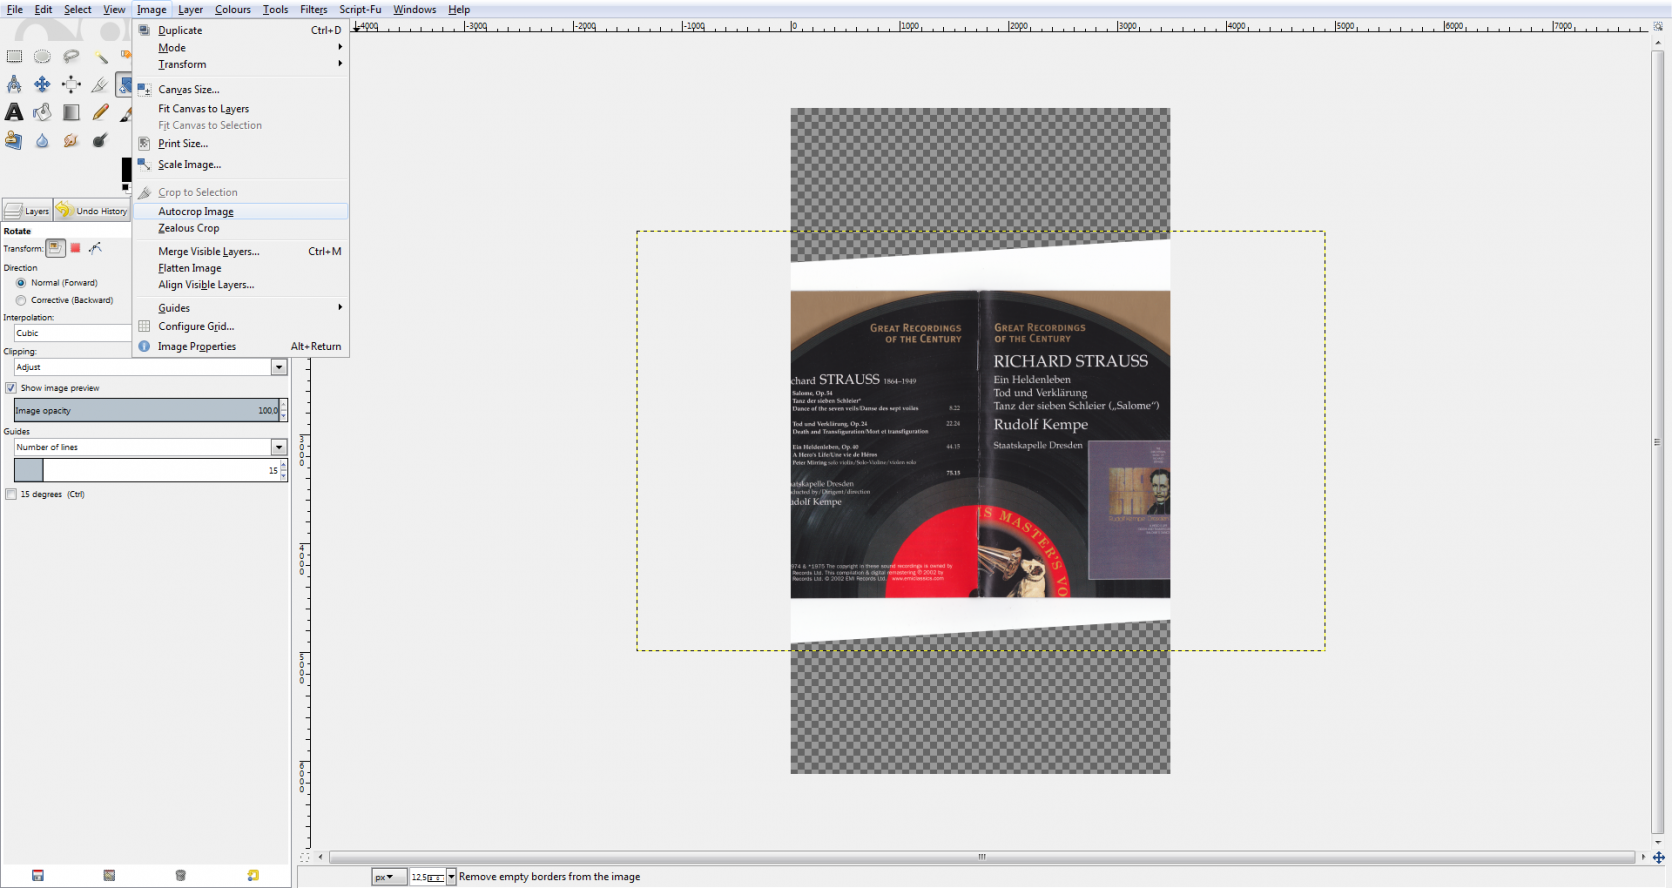
When you zoom out again, you’ll notice that some bits are missing. Image → Autocrop Image will solve that problem.
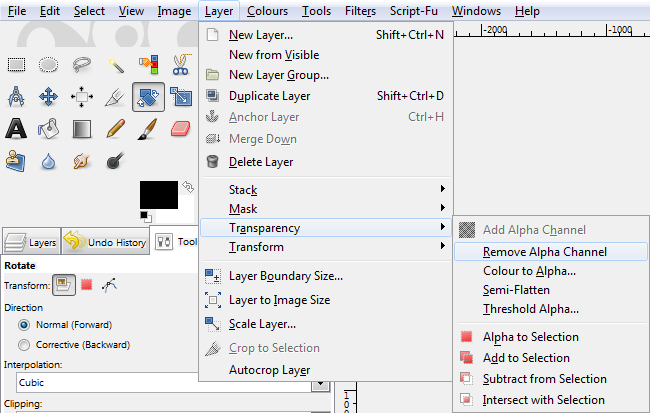
We still have a transparency (alpha) layer. Since we have no use for it and it does take space in the final image, we’ll just remove it: Layer → Transparency → Remove Alpha Channel.
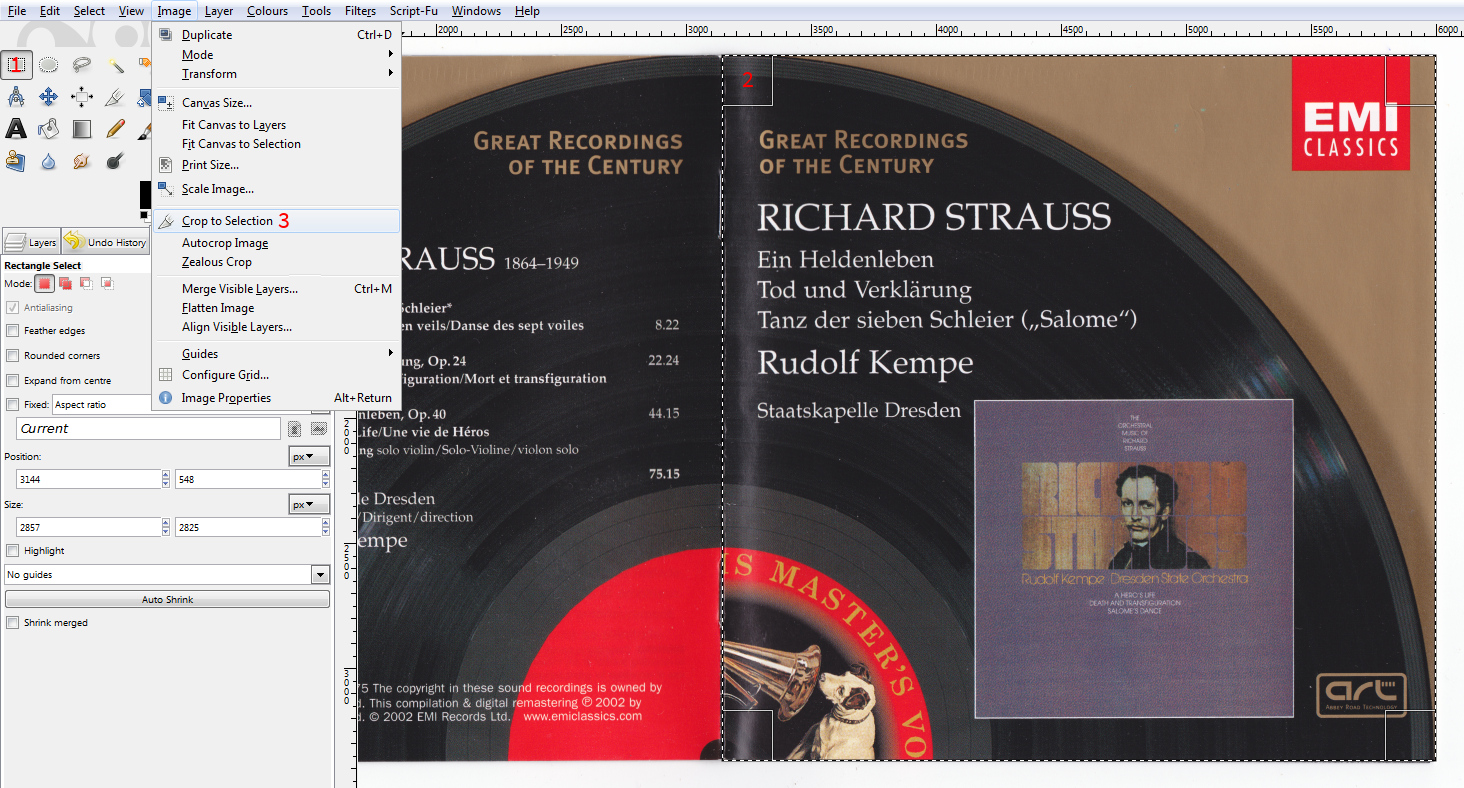
Next is cropping the image: Select the Rectangle Select Tool (1), draw the part of the image you want to crop to (you can resize the selection later by dragging the handles) (2). When you’re happy with the selection, go to Image → Crop to Selection (3).
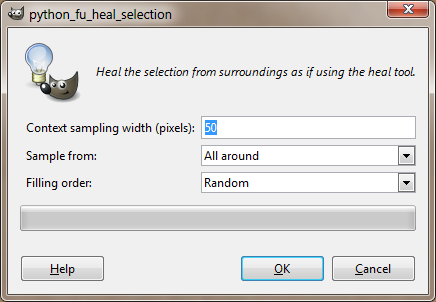
Now we’ll use the Resynthesizer plugin to repair bits of dirt, dust, small damage etc. First select all the bits you want repaired (you can add selections to the current selection by holding Shift while draging, or substract using Ctrl; you can also undo and redo selections with Ctrl+Z and Ctrl+Y). Then go to Filters → Enhance → Heal Selection.
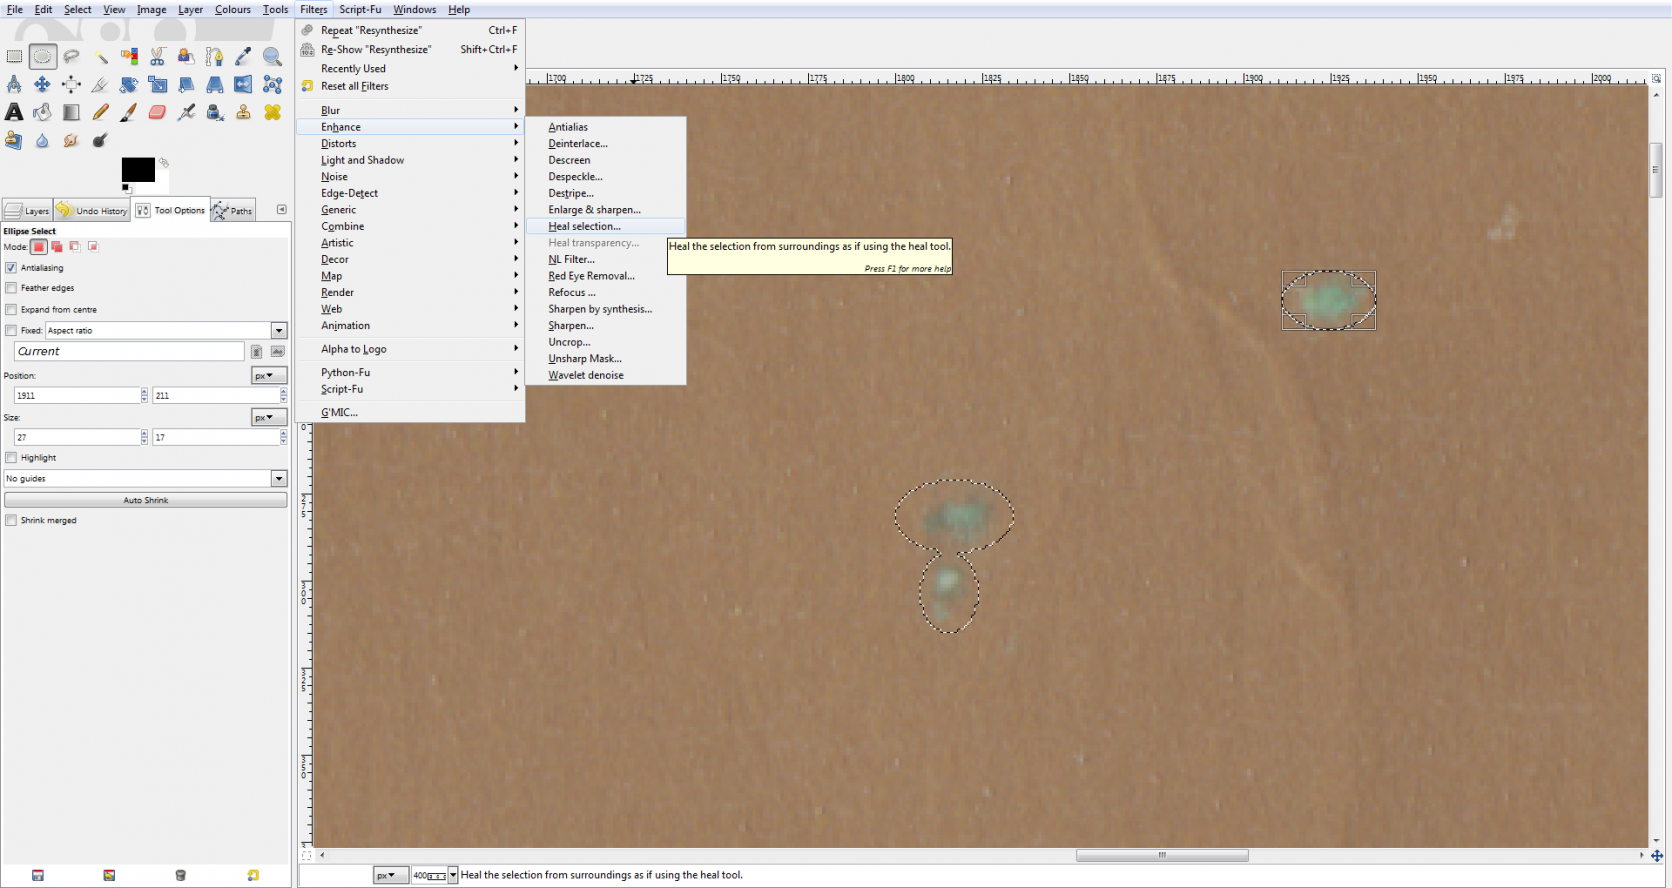
The default settings are usually good enough, but you can of course fiddle with them if you’re not satisfied with the results (see this blogpost for a more thorough introduction).
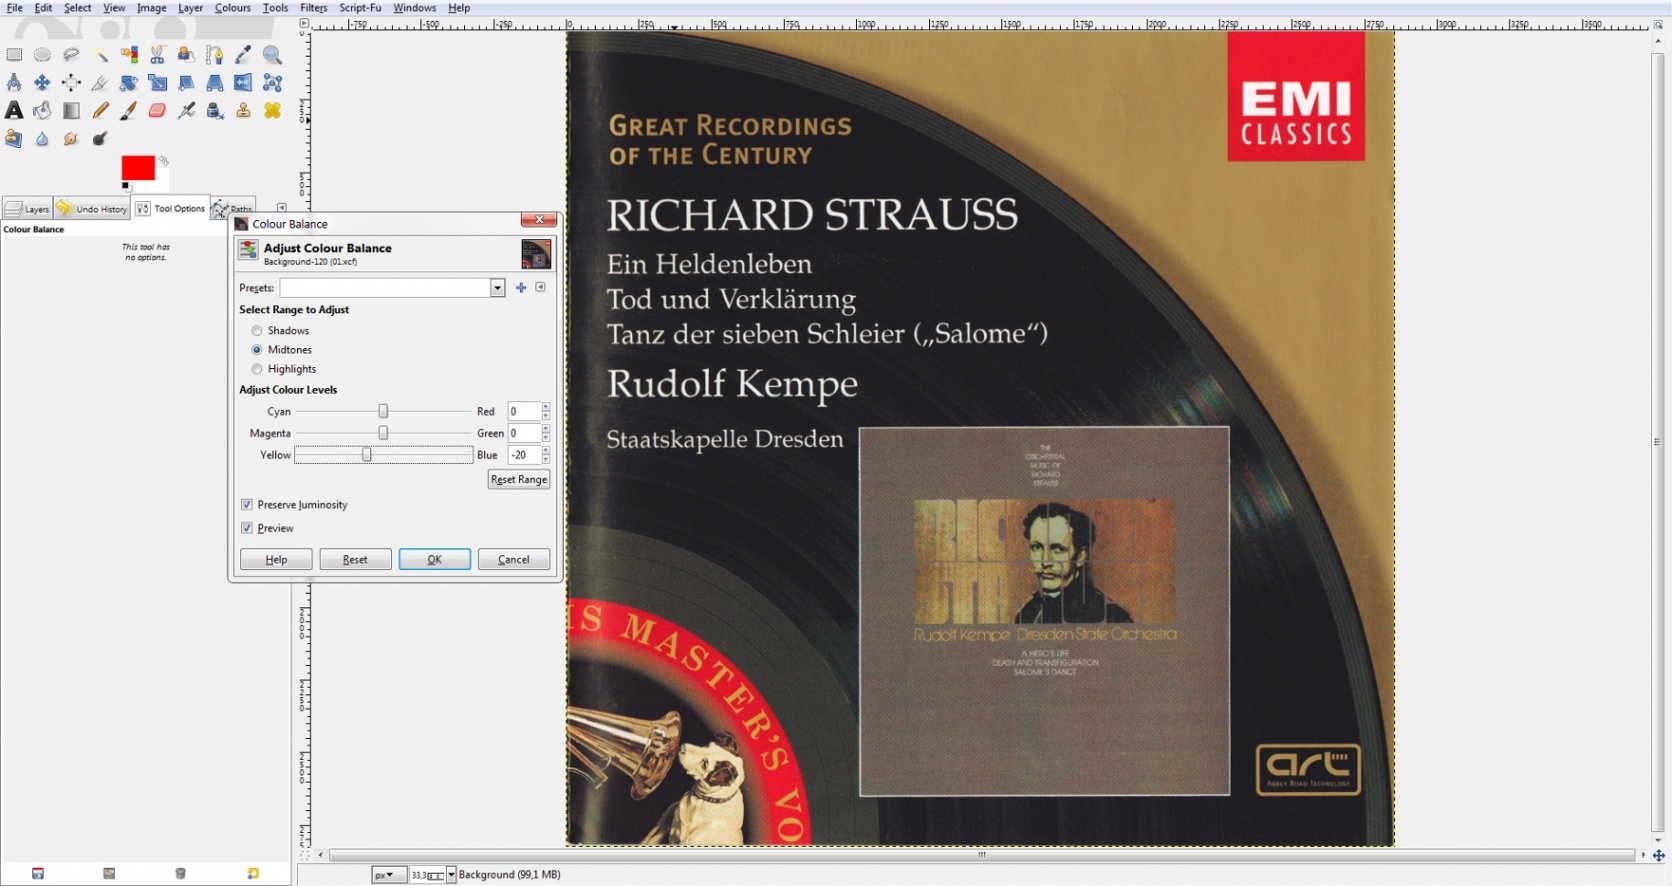
Next is the trickiest part: colour correction. It’s hard to trust your screen’s colours unless you have professionally calibrated it, so I’m usually reluctant to adjust too much. But in this case, the brown background is supposed to be gold (always a problematic colour for scanners), so I have to do something. In this case the answer was under Colours → Colour Balance. The changes are only applied after you click Ok and after that you can still undo any changes, so you can experiment with all options without having to worry about anything.
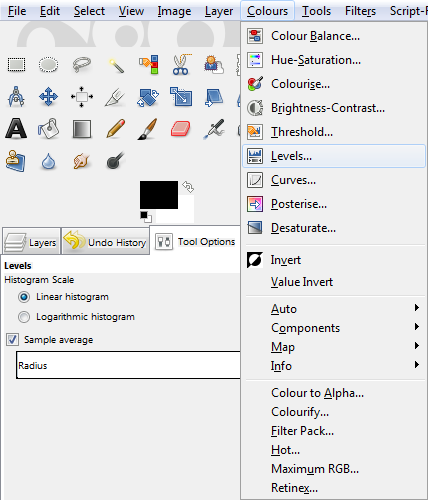
The other options in the Colours menu can be useful as well, but for now we’ll use one more:
Go to Colours → Levels.
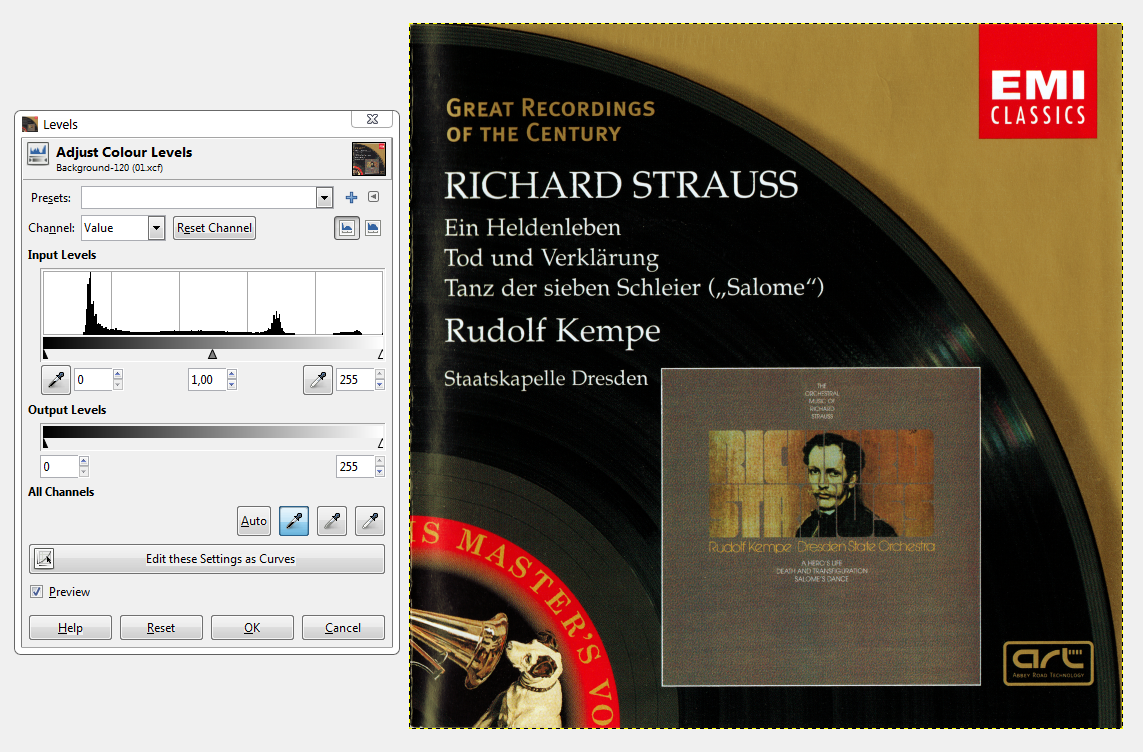
Beneath All Channels, next to Auto, there are three pipettes, a black one, a grey one and a white one. Simply click the white pipette and then click on an area in the image which should be white (like the letteres EMI). Then click the black pipette and something in the image that should be black.
The image we have is huge, and that’s probably overkill. You can resize it to whatever you think convenient under Image → Scale Image.
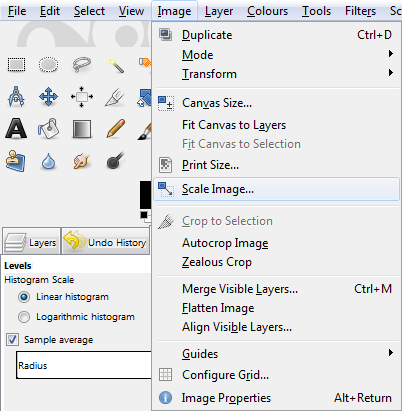
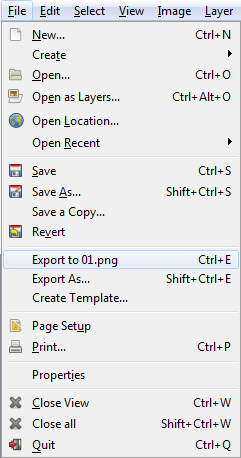
GIMP saves images in its own format, which is useful if you want to edit an image at a later date, but for MusicBrainz you’ll want to export an image to something more common. Go to File → Export to image.png or Export As…
The Cover Art Archive allows uploading JPG, GIF, PNG and PDF files. PDF isn’t an image format and GIF is only useful for animated artwork, so the choice here is between JPG and PNG. JPG is lossy, which means that every time you save it, it loses some quality. It’s also ancient, and looking at a JPG image is the visual equivalent of listening to an 64kbps MP3 you downloaded in the Napster age. PNG is lossles, and because we’re archiving something, we don’t want to compromise for quality. The Cover Art Archive will automatically generate 500px and 250 px JPG files when you upload the original anyway.
If you append .png to the file name, GIMP will automatically save as png if you click Export. The default settings are good enough, so click Export again and you’re done.
