How to Add Disc IDs
Relevant video:
Disc IDs are very useful for identifying CDs and allowing MusicBrainz to know the length of tracks on a CD. Thus, it is very valuable to add them when submitting a new CD release or when you have a CD release that does not have a Disc ID attached.
Adding a Disc ID
Let's say there is a release in the database that you own but is not attached to a Disc ID. Disc IDs are used when users use the taggers to search for CDs they own. Also, if you add a Disc ID to a release you are adding, it helps to show that you know this information is correct, and will add track times to the songs.
Note: the screenshots below are based on Picard 2.3.1. You can also add Disc IDs with several CD rippers, like Sound Juicer, Max and CUERipper.
If submitting Disc IDs is all you want you can also use libdiscid to create a small tool or submit them together with ISRCs with one of the tools listed on ISRC#Resources.
--- Note: Please do not add DiscIDs from homeburnt CDs. ---
First, put the disc into your disc drive, and start up Picard. Next, click the "CD Lookup" button.
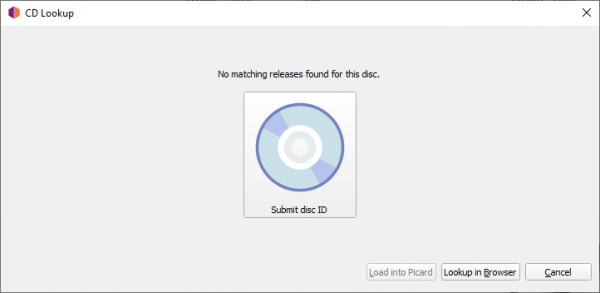
If no release that has your DiscID attached to it is found, the following window is shown:
Click on the "Submit disc ID" button. This will start up your favorite browser and take you to the "Lookup returned no match" page. There, you can either search by artist name or by release name.
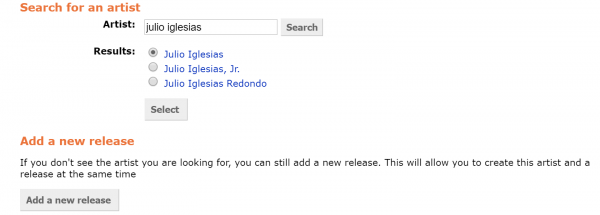
You will only see the next screen if you searched by artist name. You will be asked to choose the correct artist or search for another one. If your artist is not there, you can press "Add a new release" and add both artist and release to MusicBrainz (there's more info about how to do it in How to Add a Release). If you searched by release name, you will skip this and get a list of releases right away.
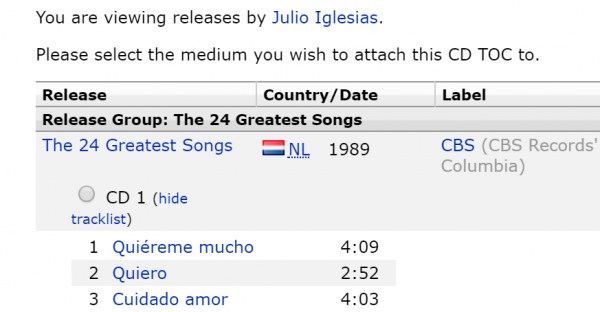
A list of releases is returned. Select the right disc by clicking on the circle by its name, and press the "Attach TOC" button at the bottom of the page. Please check the release page (accessible from the release title) to make sure the details, like catalog number and barcode, fit. If your release is not there, you can press "Add a new release" and add it to MusicBrainz (there's more info about how to do it in How to Add a Release).
You will be asked to provide an edit note. This is one of the few cases where edit notes are not that important, although writing down the release barcode and/or catalog number can be useful. When you're done, just press the "Enter edit" button.
You now have successfully attached your DiscID to a release. You will see the release page with the "Thank you, your edit has been accepted and applied" message on top of the page.
Track times from Disc IDs
When a DiscID is added track times may not show up immediately but will usually populate within 24 hours. However if there is some existing track times that don't match the DiscID, the times may not be added automatically. The process is like this:
- If one CD TOC exists for a CD, it uses that one.
- If more than one exists, it calculates the average length of all the TOCs for a given CD and picks the closest one to the average.
- If no TOCs exists close enough to the average it does nothing.
This means that sometimes, if you're sure your Disc ID is correct, you might have to apply the track times manually. For this, once the Disc ID is attached, go to the Disc IDs tab of the release. Click on the Disc ID you want to use, and you'll be taken to a CD TOC page: at the bottom you'll see a list of all the releases it is attached to. Press the Set track lengths link: you'll be taken to a really similar page, where you will have to confirm you want to do that. Enter an edit note and submit your edit: once it is accepted the track times will be changed.
Moving and Removing Disc IDs
Sometimes you'll find a Disc ID is linked to the wrong release. Note that Disc IDs are not guaranteed to be unique, and especially for CDs with a small number of tracks they can be shared by various CDs with apparently nothing in common. If you're sure that the Disc ID doesn't belong there, you could remove it or, if you know where it belongs, move it to the right release.
For this you will need to go to the Disc IDs tab of the release. By every Disc ID you'll see two links: Remove and Move. Remove will take you directly to the edit entering page, where you should add an edit note explaining why you're sure it doesn't belong there. Pressing Move will take you to a page where you can search for the release you want to move it to. You will have to select the right one (with the small circle by its name) and then press the Attach CD TOC button. Then enter the edit (and its edit note) and wait for it to be applied!
If the Disc ID is already linked to the target release, it won't be listed twice on the target release, it will only be removed from the source release.
Further Information
| How-To Pages | |
|---|---|
| Introductory Guides | Beginners' Guide · Creating an Account · Editing · Voting · Writing Edit Notes |
| Basic How-Tos | Adding an Artist · Adding Relationships · Using the Relationship Editor · Using Artist Credits · Adding a Release · Works · Events · Places · Series · Instruments · Areas |
| Specific How-Tos | Merging Releases · Merging Recordings · Removing Entities · Adding Cover Art · Identifying Labels · Splitting Artists · Adding Standalone Recordings · Adding Disc IDs · Cancelling Edits · Searching for Edits · Reporting a User · Reporting an Issue · Working with AcoustIDs · Tagging Files with Picard |


