How to Tag Files With Picard: Difference between revisions
From MusicBrainz Wiki
Jump to navigationJump to search
m (Corrected a number of minor writing errors.) |
No edit summary |
||
| Line 32: | Line 32: | ||
* [[Picard Documentation|Picard documentation]] |
* [[Picard Documentation|Picard documentation]] |
||
* [[Picard Screencasts|Picard screencasts]] |
* [[Picard Screencasts|Picard screencasts]] |
||
{{HowtoBox}} |
|||
[[Category:MusicBrainz Picard]][[Category:How To]][[Category:WikiDocs Page]] |
[[Category:MusicBrainz Picard]][[Category:How To]][[Category:WikiDocs Page]] |
||
Revision as of 17:39, 3 July 2013
Products > MusicBrainz Picard > Picard Documentation > How to Tag Files With Picard
This quick start guide describes how you can tag your files using MusicBrainz Picard.
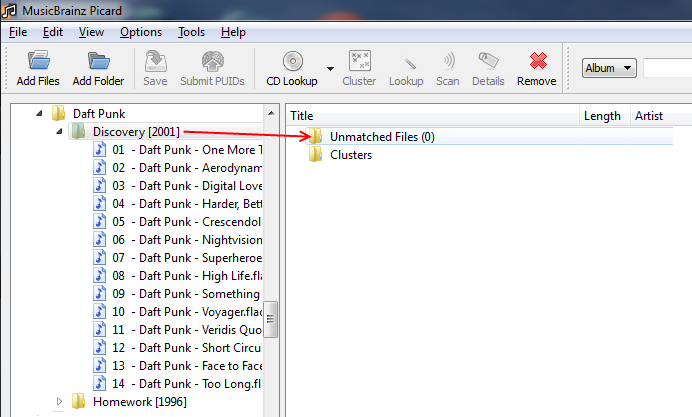
- Click View, and then click File Browser.
- Drag a folder to the Unmatched Files folder in the right-hand pane.
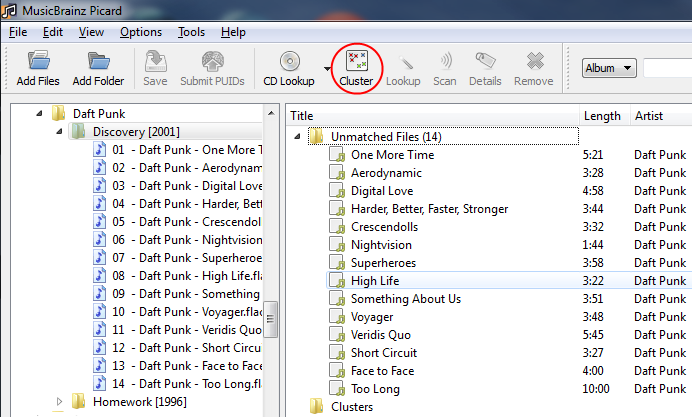
- Wait for Picard to process the files (the names will turn from grey to black) and then click the Cluster toolbar button to cluster files into album clusters.
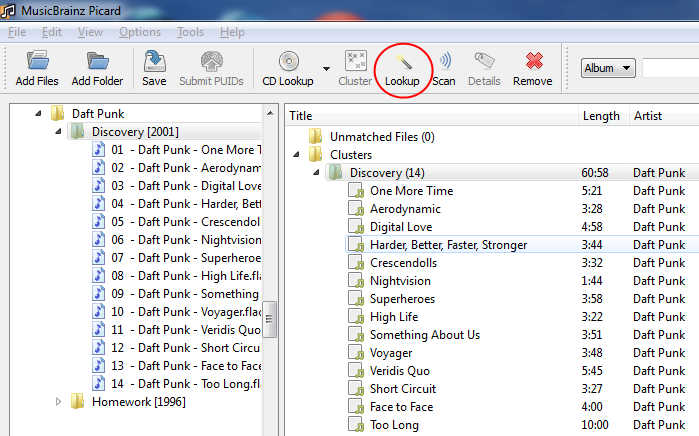
- Select a clustered album and click the Lookup toolbar button to look the cluster up. Depending on your previous metadata, album will show up in the right-hand pane. If an album shows up, go to step 7. Since you are a new Picard user, we recommend that you read the steps in between as well.
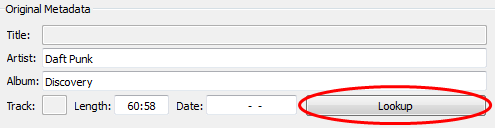
- If nothing happened when you clicked the Lookup toolbar button, click the Lookup button in the bottom panel. Your default browser will open and allow you to find the right album manually.
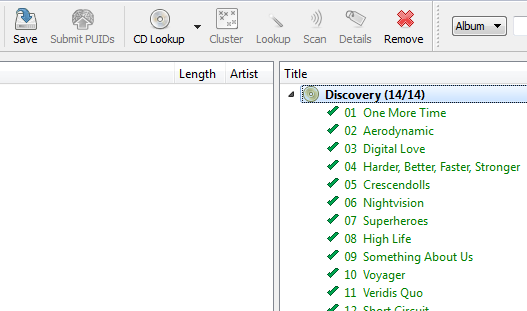
- Pay attention to the amount of tracks in each album, and pick the one you have. Click the
 icon.
icon.
- Drag the clustered album onto the album that was just opened, if it didn't happen automatically.

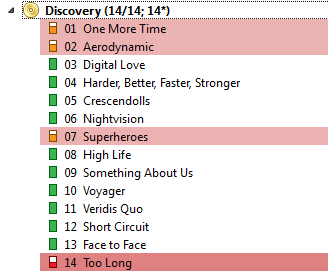
- Depending on your previous metadata, Picard will try to guess the matching tracks. The order is green > yellow > orange > red, where green is the best match. If you are seeing a lot of red and orange, it could mean that Picard has guessed wrong, or that your files didn't have a lot previous metadata to work with.
If this is the case, it's recommended to click a track and compare the metadata using the Original Metadata and New Metadata panels at the bottom of picard window. If there is an incorrect match, simply drag & drop the track to its correct spot.
- When you are satisfied with the matches, select the album you want to save and click on the Save toolbar button to save files.

- A green check mark means the file is saved in its proper location.


At first there may not seem much to Picard, but a lot of Picard's power is in its extensive drag and drop features. Try some of these operations:
- Drag a file from the file browser to an album track.
- Drag a file from the file browser to an album -- this attempts to match the file to the album automatically.
- Drag a directory from the file browser to an album -- this attempts to match all the files from the dir to the album.
- Drag an album cluster onto an album to match the cluster to the album.
- Drag one album onto another to match all the files from one to the other.
- Drag an album cluster into unmatched files to move the cluster back to unmatched.
- Drag unmatched files from an album onto another album or back to unmatched files.
Related How To Articles
Further Information
| How-To Pages | |
|---|---|
| Introductory Guides | Beginners' Guide · Creating an Account · Editing · Voting · Writing Edit Notes |
| Basic How-Tos | Adding an Artist · Adding Relationships · Using the Relationship Editor · Using Artist Credits · Adding a Release · Works · Events · Places · Series · Instruments · Areas |
| Specific How-Tos | Merging Releases · Merging Recordings · Removing Entities · Adding Cover Art · Identifying Labels · Splitting Artists · Adding Standalone Recordings · Adding Disc IDs · Cancelling Edits · Searching for Edits · Reporting a User · Reporting an Issue · Working with AcoustIDs · Tagging Files with Picard |